Lightroom presets are previously set ‘image-editing’ settings that are used in images during editing in Adobe Lightroom tools. With presets one can convert his pictures with just one click to get the expected looks or effects he wants. Presets make the photo editing workflow fast as there is the option to previously set for what one needs to edit his images, then it just needs one click for multiple adjustments in one image. Consistency and efficiency are well maintained in applying presets that are especially useful for professional photographers.
Lightroom Adobe software has multiple versions for different kinds of devices, such as the Lightroom Classic version designed for Desktops, and has extensive tools for professional photo editing process. Lightroom CC is cloud-based that’s why it’s known as Lightroom Creative Cloud, this version is also for desktop and easy to use. The Lightroom Mobile version has an easy feature for editing photos.
Installing Presets in Lightroom Classic (Desktop)
Using the Import Function
Step-1. Download and Unzip Presets:
First Download the preset from the authentic platform and unzip the file if it is in zip format.
Step-2. Open Adobe Lightroom Classic:
Install Adobe Lightroom Classic on your Desktop.
Step-3. Navigate to the Develop Module:
After opening the application you will find the ‘Develop’ module at the top of the screen, click on that to switch to the editing interface.
Step-4. Locate the Presets Panel:
The ‘Presets’ panel is on the left sidebar.
Step-5. Import Presets:
There is a ‘+’ icon next to ‘Presets’ Click on that and select the ‘Import Presets’ option, now you will have the imported presets in your ‘Presets’ panel, and apply them in your photo editing based on your criteria.
Manual Installation
Step-1. Download and Unzip Presets:
In the Manual installation process you need to download and unzip the preset files like the import functionality process.
Step-2. Open Adobe Lightroom Classic:
Install Adobe Lightroom Classic on your desktop.
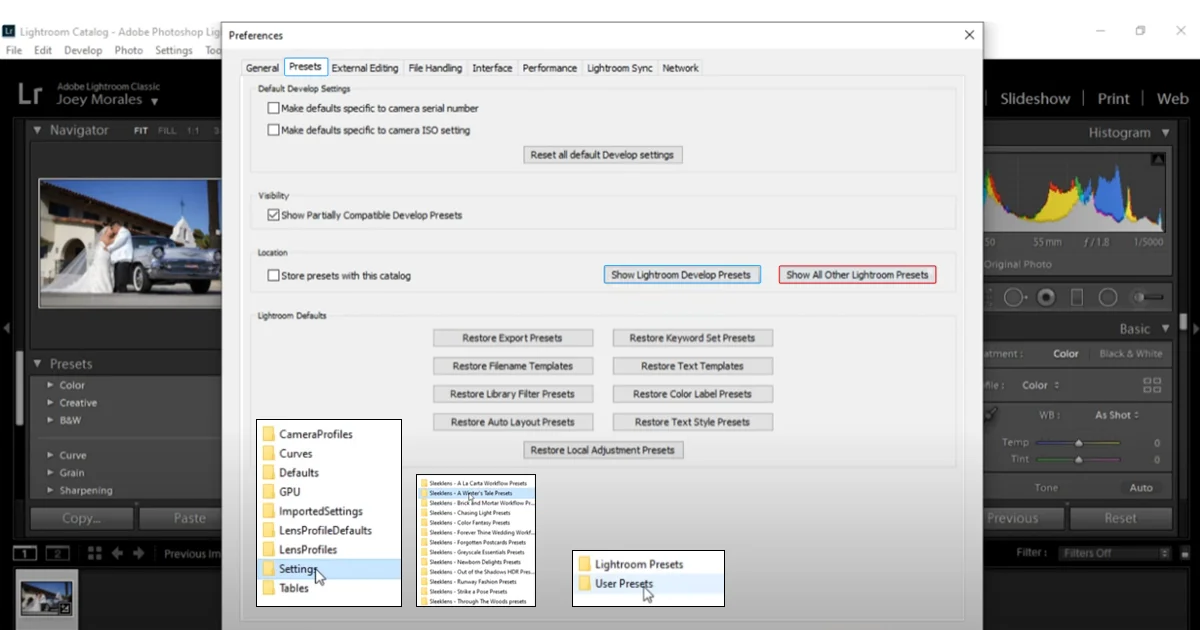
Step-3. Access Preferences:
After opening the Adobe Lightroom Classic check the menu bar at the top and click on the ‘Edit’ option and select ‘Preferences’.
Step-4. Open Presets Tab:
Click on the ‘Presets’ tab that you will find in the preferences window.
Step-5. Show Lightroom Develop Presets:
In this step, you have to click on the ‘Show Lightroom Develop Presets’ button, after clicking that button a folder will appear where Lightroom stores the presets.
Copy the Presets and paste them into the Develop Presets Folder, then go to the file explorer window and check the ‘Settings’ in the ‘Lightroom’ folder. Copy the Preset file, unzip them if they are in a zip mood, and paste them into the ‘Settings’ folder. One thing to consider when unzipping any zip file make sure they have a ‘.xmp’ extension.
Step-6. Restart Lightroom:
In the final step Close and restart Adobe Lightroom Classic to load and recognize the new presets in your application. Now you will get your presets in the ‘Presets’ panel in the Develop module and they are ready to utilize in your images.
Installing Presets in Lightroom Classic Mac
Using the Import Function
Step-1. Download and Unzip Presets:
First download the preset files and unzip them if they are in zip format, make sure the unzipped files are in .xmp format.
Step-2. Open Adobe Lightroom Classic:
Install the Adobe Classic application on your Mac device.
Step-3. Navigate to the Develop Module:
At the top of the screen you will find the ‘Develop’ module, click on that to switch the editing interface.
Step-4. Locate the Presets Panel:
Check the left sidebar for the ‘Presets’ panel.
Step-5. Import Presets:
Besides the ‘Presets’ option there is a ‘+’ icon, click on that and select the ‘Import Presets’ option, after that check the location in the file explorer window where your unzipped preset files are stored. Select the presets that you want to import and click the ‘Import’ button, then the imported presets will be available in the ‘Presets’ panel and ready to use.
Manual Installation
Step-1. Download and Unzip Presets:
Download and unzip the preset files on your Mac device.
Step-2. Open Adobe Lightroom Classic:
Install and open Adobe Lightroom Classic.
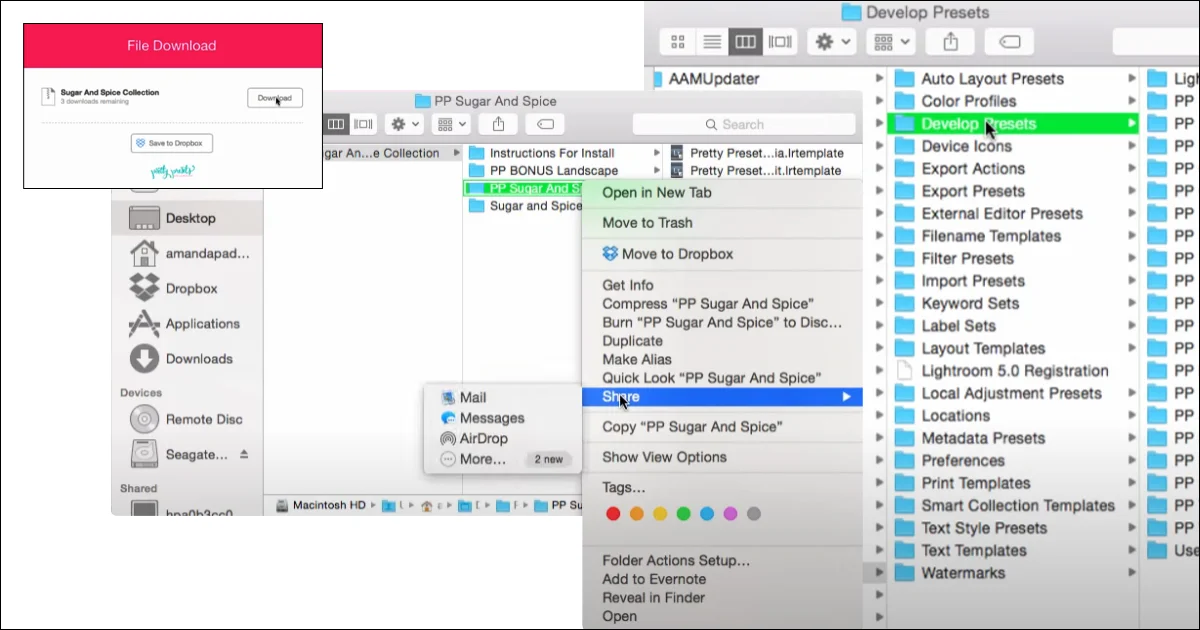
Step-3. Access Preferences:
After opening find the top menu bar click on the ‘Lightroom Classic’ option and then select the ‘Preferences’ option.
Step-4. Open Presets Tab:
Click on the ‘Presets’ tab in the preferences window.
Step-5. Show Lightroom Develop Presets:
Check for the ‘Show Lightroom Develop Presets’ button and click on that and you will get the Finder window where Lightroom has saved all presets, copy them and paste them into the Develop Presets Folder. Go through the ‘Settings’ folder located in the ‘Lightroom’ folder in the Finder window and copy the presets files that are unzipped format, paste them in the ‘Settings’ folder.
Step-6. Restart Lightroom:
Finally restart your Adobe Lightroom Classic Application and you will see the new presets are fully loaded into your Adobe application and you will find them in the ‘Presets’ panel.
Installing Presets in Lightroom CC (Desktop)
The installation process of Presets in Lightroom CC (Desktop) is similar to the process previously discussed in the section “Installing Presets in Lightroom Classic (Desktop)” although here is the specific process you can check.
A. Download and Unzip Presets:
Firstly download the preset files from the official platform and unzip them if they are in zip format.
B. Open Adobe Lightroom CC:
Install and open Adobe Lightroom CC on your desktop.
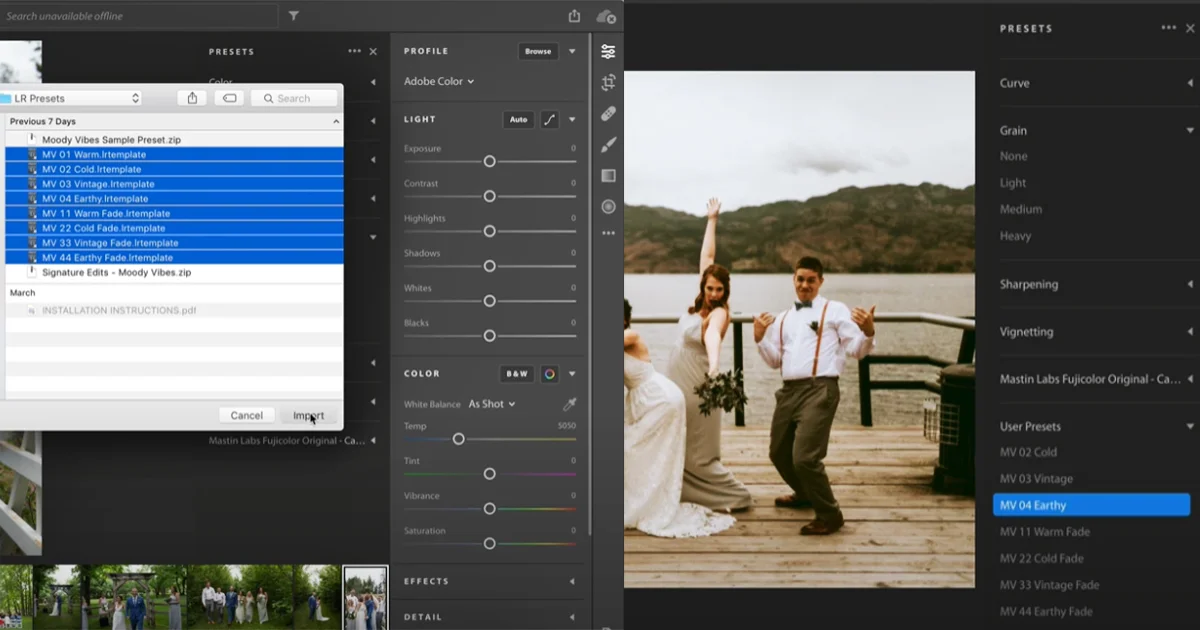
C. Import Presets:
Check and go through the ‘Editing section’ in the Adobe Lightroom CC application, you will find an ‘Edit’ option in the three-dot bar on the right side of the screen, click on that ‘Edit’ icon and you will get the ‘Presets’ panel, click on that and find the three dots at the top of the presets panel and click, after that select ‘Import Presets’ button and in the file explorer window check the location where you previously saved the unzipped preset files, select and import them by clicking into the ‘Import’ option. and find the imported presets in your ‘Presets’ panel.
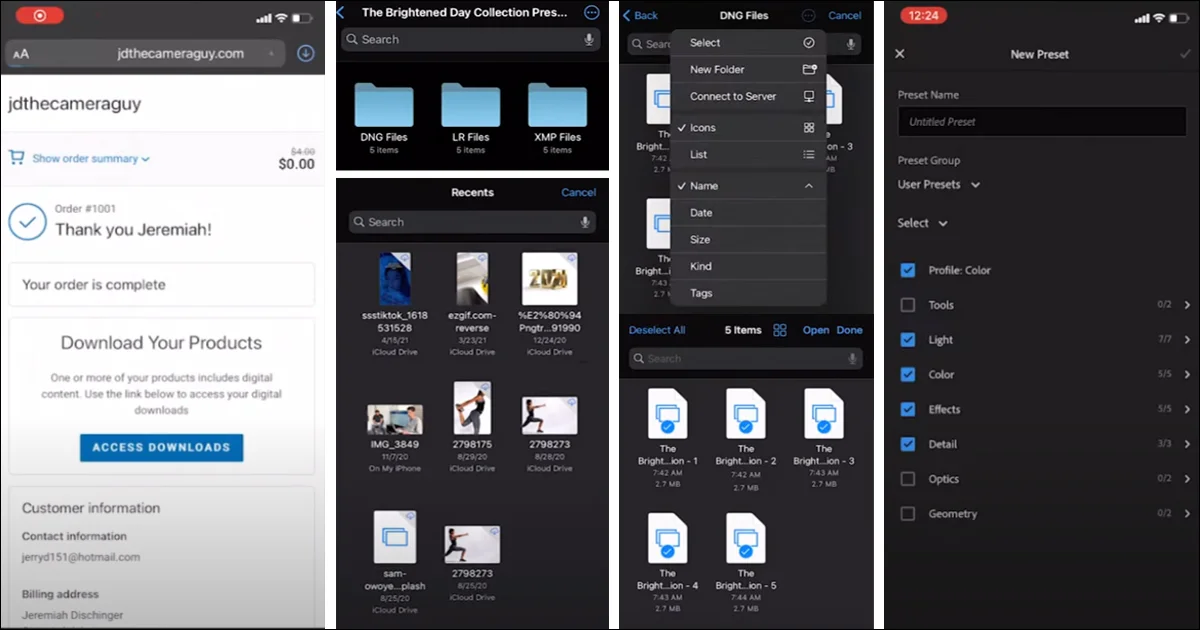
Installing Presets in Lightroom Mobile
In 4 steps one can install Presets on Mobile devices, here are the steps:
Step-1. Download and Unzip Presets:
Download the presets and unzip the presets if it’s in zip format, there are a lot of tools available for mobile to unzip files, you can use them to unzip your file.
Step-2. Import Presets into Lightroom Mobile:
Install and open the Adobe Lightroom mobile app and add the downloaded presets to the app. After adding the presets create a new album and organize the added presets. You can rename them for your advantage.
At the top of the mobile screen on the right side find the ‘Add Photos’ option or a ‘+’ Icon, click on that and select the option where you saved your unzipped files, it could be in your ‘Camera Roll’ section or any others folders. Select and import them into the Lightroom.
Step-3. Create Presets from unzipped files:
Open the preset files that you imported, go through them, and select one of them to open. After opening one preset click on the three dots in the top right corner and select the ‘Create Preset’ option after that you can name your presets differently and save them into a specific album, click the checkmark icon to save your preset.
Step-4. Using the Presets:
Select a photo that you want to edit check the ‘Presets’ section and click on the preset icon, after that select the previously stored preset group and pick the one you want to apply to your photo.
Installing Presets in Lightroom iPhone
Step-1. Download and Unzip Presets:
Download the presets and unzip if it’s in zip format.
Step-2. Import Presets into Lightroom Mobile:
Save the downloaded presets on your iPhone device. Install and open the Adobe Lightroom mobile app and add the downloaded presets to the app. After adding the presets create a new album and organize the added presets. Rename them for easy access.
At the top of the mobile screen on the right side find the ‘Add Photos’ option or a ‘+’ Icon, click on that and select the option where you saved your unzipped files, it could be in your ‘Camera Roll’ section or any others folders. Select them and import them into the Lightroom.
Step-3. Create Presets from unzipped files:
Open the preset files that you imported, go through them, and select one of them to open. After opening one preset click on the three dots in the top right corner and select the ‘Create Preset’ option after that you can name your presets differently and save them into the specific album, click the checkmark icon to save your preset.
Step-4. Utilize the Presets:
Select a photo that you want to edit check the ‘Presets’ section and click on the preset icon, after selecting the previously stored preset group pick the one you want to apply to your photo.
Benefits of Using Presets
In Adobe Lightroom, Presets provides a wide range of benefits, such as it has versatile features to enhance efficiency, consistency, and creativity in editing photos.
Efficiency:
It makes the photo editing workflow smooth and fast. Good for professionals as it saves time and requires less effort and by using Presets one can edit a series of images in a very short time.
Consistency:
By utilizing Presets you can make sure to have a constant and appropriate look in your images. that looks very professional.
Creativity:
Presets offer a vast number of unique effects and styles that help editor add creativity to their photos.
Conclusion
In conclusion, utilizing Presets in Adobe Lightroom can improve your photo editing skills, and one can automate his editing process as much as he wants. Even complex images can be edited smoothly with Presets just using a single click. The ability to edit a series of images effectively and shortly it became the best choice for professional photo editors and experts, as it is increasing productivity in photo editing works. To know about more photography tips read other style of photography blog.

